Blog
8 Easy & Simple Closet Organization Tips
January 17, 2016
What’s lurking behind that closet door? Do you open it slowly, in fear of what might come tumbling out? It’s easy to ignore your storage clutter, but why not just invest the time to take control, rather than the other way around? Here are some closet organization tips to guide you on your way.
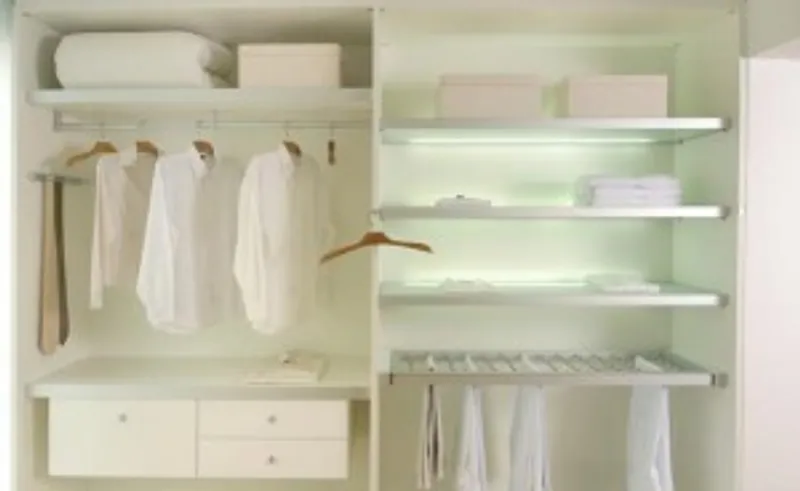
- Start on empty. When you de-clutter, you need to give yourself a blank canvas to start all over. Don’t just move around what’s already in there; that’s like painting over a mistake. Take a deep breath, open the door, and remove all of the contents of your closet.
- Sort through everything you’ve removed from the closet and place each item in one of three piles: Keep, Donate, Move. The “Keep” items will go back in the closet once it’s reorganized. “Donate” goes to a charity. “Move” will be stored elsewhere, in a place where it might be used more often by being more accessible. For example, if you have shoved toys into your bedroom closet to get them out of the way, move them back to the kids’ rooms.
- Take inventory. Look at the items you want to keep in the closet. How do you want to store them? Are you going to fold the clothes or linens? Will they be in bins or boxes? Do you have oversized or heavy items that will need a larger or stronger space? Determine how many things will need to be on a hanger; you might discover that you don’t need a rod that extends across the full length of the closet, freeing up more space for shelves or open storage. If you have more short clothing items (shirts, jackets) than longer ones (dresses), maybe you’ll benefit from a double rod where you have two rows for your clothing, one above the other.
- Take measurements of your closet space. This will help you choose closet organization systems that fit. If you have lots of shelves, measure the height between each. You might determine that you should remove one or two shelves to store taller things. Plan to limit your stacks to no more than a foot to avoid toppling, and allow about four to six inches between the piles to reach between them.
- Maximize the space. Don’t forget to include the closet door and floor in your storage planning. You could hang a shoe tree or jewelry organizer on the door, or mount pegboard for easy access to things, like tape, scissors, rulers, notepads, jewelry, and other items that often get buried in a drawer. Organize the closet floor space using boxes on casters for shoes, toys, and other pieces you want to access easily. Mount hooks on the door and walls of the closet for extra hanging space, for things like scarves, neckties, handbags, and jewelry.
- Assemble your storage space. Now that you have an empty closet and have sorted out the things that will be going back in there, install the racks, rods, and shelves. Next, label the bins, boxes, and baskets with whatever will be stored in them. There are plenty of creative ways to tag your storage, like luggage tags, chalk-painted adhesive labels, and even photos (perfect for children’s storage).
- Light it up. If you don’t already have a light in your closet, add one. Save yourself the time of digging around in the dark and messing up your beautifully organized closet. If you don’t want to hard-wire a light, use a battery-operated light that sticks to the ceiling or wall.
- Restore your storage. Be mindful as you replace the items in your closet. Make sure the things you use the most are also the most accessible. Group clothing items together (stack t-shirts in one stack, sweaters in another). Hang up your clothing by shirts, blouses, jackets, pants, and skirts—all facing in the same direction. When you wear something and hang it back up, face the hanger in the opposite direction, so you can easily see what you’re not wearing.
Most importantly, once you’ve invested the time in re-creating your closet storage, be vigilant about keeping it organized. Follow your new system, and urge others in your household do the same.
Latest Posts
Jul 23, 2026
What Devalues a House the Most? A Buyer's Guide to Finding Move-In Rea...
Sep 17, 2025
New Home Move-In Process: Everything You Need To Know
Jul 10, 2025
You Made It: Discovering Destination Homes
Jun 5, 2023
Welcoming Wilcox!
Apr 21, 2023
Up to $20,000 of Financial Assistance for First-Time Homebuyers
Apr 13, 2023
Preparing Your Home for Potential Spring Flooding
Mar 1, 2023
5 Garage Organization Tips to Cut the Clutter
Nov 15, 2022
Progress on the long awaited Watercourse in Daybreak!
Oct 12, 2022
Hill Farms Weekend Walking Inventory Tour
Previous Article
6 Easy Tips for Bold Teenage Bedroom Design
Next Article